Saturday, November 23, 2013

I Can't Believe It's Not Spaghetti

How To Make: Spaghetti Squash

Before I begin, I want to reiterate: I love carbs.  Bread, cakes, rices, pasta, it doesn't matter which one, I love them all.

Unfortunately, my thighs don't love them as much as I do.

While I will never. ever give them up, I do occasionally look for a substitute that I can rotate into my weekly dinner options.  

Well, okay...monthly dinner options.  Let's not get too excited here.

IMG_4992

On first glance, you have to admit...it looks just like spaghetti.  In fact, I bet spaghetti squash could be one of the easiest ways for parents of youngsters to get their little guys to eat their veggies.  Of course, the older they are, they might be able to recognize the difference.

Spaghetti squash has a little bit of crunch.  That's my only complaint and the only factor that truly separates it from being a legitimate all the time replacement for spaghetti.  There isn't much that can be done to soften it up anymore than following the below directions: 

What you will need:

Spaghetti squash
Olive oil
Salt 
Pepper
Garlic powder (optional)
Spaghetti sauce

Preheat the oven to 415 degrees.

We start with a simple, lone spaghetti squash.  One squash should serve 3-4 people.

IMG_4978

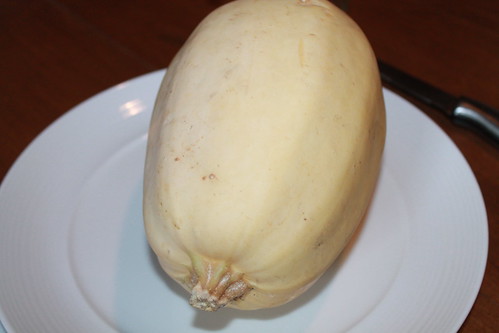
Alright, I'm going to make a confession.  The squash pictured above is a different one from the one pictured below.

That is the product of starting a recipe and randomly taking pictures rather than thinking the process through and taking pictures of each step.

I just didn't want you to be confused.

You're welcome.

IMG_5118

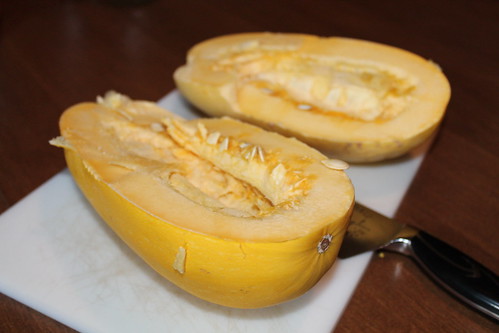
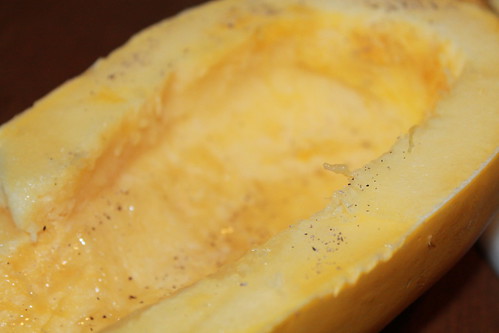
Slice the spaghetti squash in half lengthwise.  If you are anything like me, the first time you do this you are going to think you are doing everything wrong.  Hopefully, this post will help you.

IMG_5119

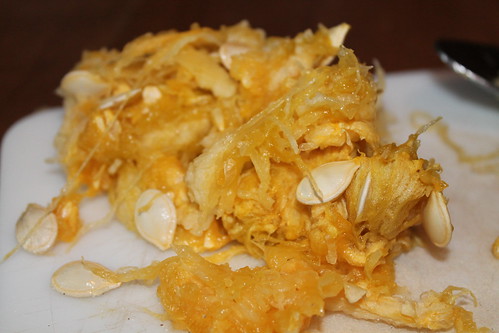
Get rid of the guts.  You could reserve the seeds and bake them, but I'm not too into squash seeds, so I didn't. 

IMG_5123

Drizzle a little olive oil on both sides of the squash, then salt and pepper them as well.

IMG_5124

Using a rimmed baking pan, drizzle olive oil liberally all over.*

*Note: This step was left out in the making of the above spaghetti squash.  For the above time, I poured about a cup of water in the pan.  After trying it both ways, I like the olive oil way better.  It gives me less of a chance to spill hot water everywhere.

Not that that has happened before.  

Place the squash flat side down on the pan.

IMG_5129

Cover the pan with foil and bake for 45 minutes.

IMG_5131

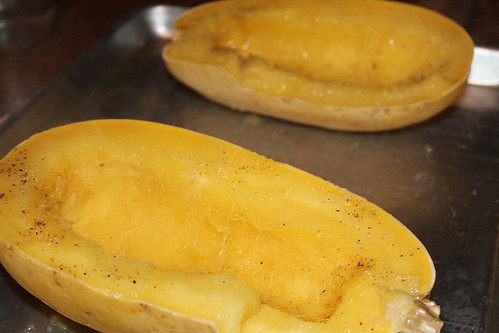
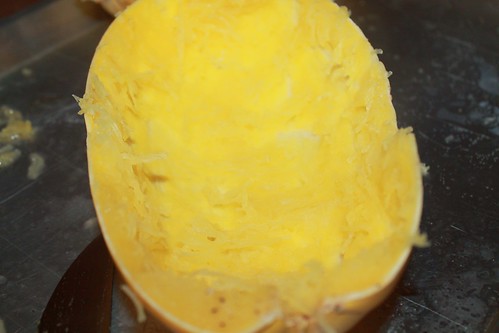
The exterior of the squash should be much softer now.  Do not flip the squash  over with your bare hands.  If you're patient, take the pan out of the oven and wait about ten minutes.

If you're like me, and you're still working on the patience thing, use an oven mitt or two spatulas to flip the squash over.

IMG_5132

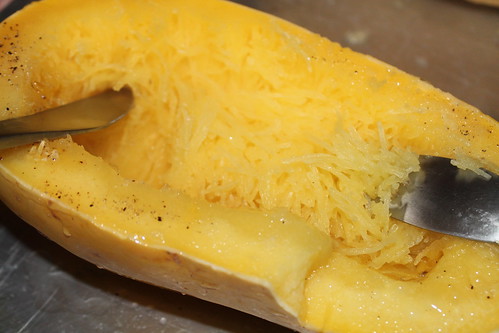
Using a fork and knife, use the knife to hold the squash in place as you drag the fork against the body of the squash.  Little spaghetti like pieces of squash will begin to fall off with the movement of the fork.  If you find that it is not happening so easily there is probably one of two problems taking place.

1. It needs to bake a little longer.  Flip the squash back over, and throw that pan in the oven.

2. You didn't buy a spaghetti squash and you are trying to make something impossible happen to some other creature.

I really hope it isn't #2.

IMG_5135

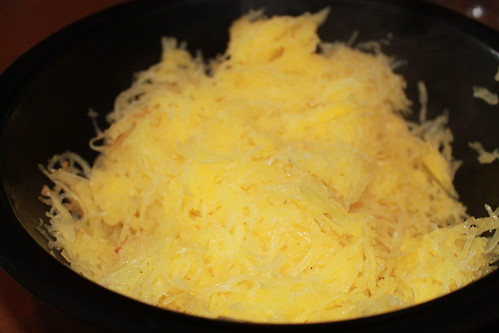
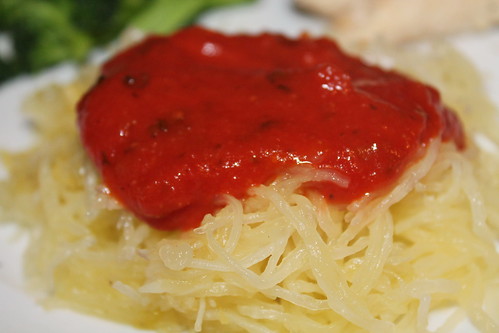
Place your spaghetti in a bowl.  Sprinkle some more salt and pepper and some garlic powder for extra flavor.

IMG_5136

Make sure you scraped as much of the spaghetti out as possible.  There should be an empty squash carcass by the end.

IMG_4991

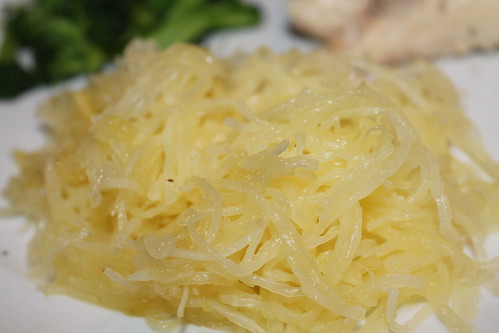
Serve with anything that you would normally eat spaghetti with.

IMG_4993

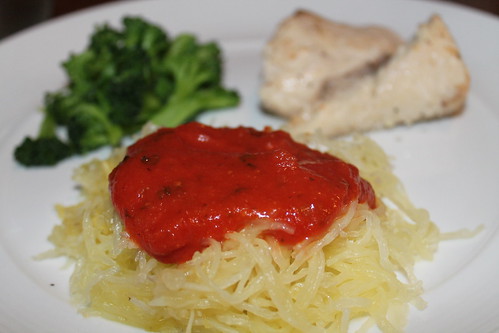
Again, for a once in a while substitute, spaghetti squash is pretty awesome.  If you're counting calories it should save you about 200-400 calories from your dinner.

Leaving just enough calories in your daily allotment to get a latte, and maybe even a cookie.


Wednesday, November 6, 2013

Chocolate Chip Pumpkin Muffins...the way they should be

Recipe: Pumpkin Chocolate Chip Muffins
Source: The Minimalist Baker
http://minimalistbaker.com/pumpkin-chocolate-chip-muffins/
Time: 40 minutes
Ease: 2
Taste: 5
Leftover Value: 5
Down the Drain or Keep in the Strainer: Down the Drain*

*With my adjustments, it becomes Keep it in the Strainer!

During fall, I jump on the pumpkin bandwagon just like the rest of the world.*  In fact, you might remember how I became a little obsessive with pumpkins last year.  This year, time hasn't lent itself for me to make my own pumpkin puree.

*Note: Except for Starbucks' pumpkin spice latte (currently being trendily called "PSL").  For some reason, I not only dislike the PSL, I strongly dislike it.  I drink pumpkin coffee and lattes other places, but my beloved Starbucks has not met with my satisfaction on this one.*

*Note to the note: I'm really sorry about this.  Please don't judge me.


The season is still young, yet this unfortunate lack of time means that I've been using this stuff:

IMG_6405

I've been bookmarking and dog earring tons of pumpkin recipes from magazines and the bazillion blogs that I follow.  I've also been concocting a few of my own--hello, pumpkin scones!

My first pumpkin choice came out of necessity.  There was nothing to eat for breakfast in my house and I decided chocolate chip pumpkin muffins would be the perfect choice.

The blog I got the recipe from is one I started following recently.  While it was obvious before she even stated it that these are "vegan" muffins, I knew I would be making adjustments so that these muffins would work in my normal world kitchen.

For example, she uses a "flax egg" which is made from flax seed meal and water.  Well, flax seed meal is expensive, and I happen to always, always have eggs on hand.

Therefore, adjustment to the recipe #1: "flax egg" replaced with chicken egg.

IMG_6411

I have had these dainty measuring cups hanging around in my kitchen for years now.  I bought them a little before I started the Orange Strainer but never had the nerve to dirty them.  Then the dust in my kitchen found them and I decided they would be better used measuring food than measuring the dust.

IMG_6416

The second adjustment to this recipe came right after the first.  It called for almond milk with 1 T of lemon juice which is basically just homemade buttermilk, except for the fact that they are using almond milk.

Are you confused?   Because I certainly am.

I used 1% milk to make buttermilk.

Oh boy.

IMG_6424

Next, making sure that each of my four dainty cups was able to be used for this recipe, some brown sugar needed to be thrown in.  So far, the only normal part of the recipe.

IMG_6427

If you're feeling particularly pretentious, grab your grape seed oil (seriously?) and pour in 2 T.

IMG_6430

Since I can't imagine grape seed oil truly making a world of a difference in pumpkin muffins, I went with the good old fashioned canola oil that was hiding under my sink.

IMG_6432

Add a splash of vanilla.  Whisk together everything you've put in so far.  Then sprinkle in the baking powder, baking soda, salt, and cinnamon.  Whisk again until the mixture looks like this:

IMG_6440

Now for the adjustment to this recipe that not only saves money, it actually makes it taste better.  The recipe calls for what I call a 50/50 flour mixture.  Meaning, you're trying a little bit to be healthy by using whole wheat flour, but you're also being a little naughty by using, gasp, white flour.

I've tried it this way, and it gives the muffins a deliciously cardboard type flavor.

Yum?

No.  

Exactly.

Swap out the 3/4 cup of whole wheat flour for more white flour.  Save the whole wheat nonsense for another recipe on another day.  Your taste buds will thank me.  

Regardless what kind of flour you choose to use, sift the flour directly into the pumpkin mixture.  This is awesome because it leaves you only using one mixing bowl.  (Not counting the sifter, the measuring cups, and measuring spoons).

IMG_6442

Toss in 1/3 cups of chocolate chips.  I only had mini chocolate chips, so that's what I used.  Personally, I would prefer the regular sized ones.  

IMG_6445

Also, I personally wanted more than 1/3 cup of chocolate chip as you can see by my cup which I filled to overflowing.

IMG_6447

I used an ice cream scoop to fill my muffin cups.  The first time I did only one scoop and managed to fill 18 cups.  I wasn't too happy with their size.

IMG_6451

Nothing says muffin like a muffin top, which sadly, this is lacking.

IMG_6458

My second time around I filled the cups with a scoop and a half, filling only 12 muffin cups.  Then I did this:

IMG_6461

You really can't have chocolate chip muffins, even if pumpkin is the main attraction, without a healthy sprinkling of chocolate chips on top.

IMG_6462

Much better.  I think using the mini chocolate chips here makes for a much more inviting muffin.

IMG_6463

With my adjustments, these muffins were worthwhile.  They were still not drop everything you're doing and do the happy dance delicious, but definitely worth making again.